By the end of the year, I will have finished two quilts (though neither are
entirely pieced yet), so I'm already looking on the lookout for new projects and patterns. Since I'm so busy taking care of E (who's now almost eleven months old!) and working, having two big projects dominate my design wall, sewing table, desk, and all other surfaces in our study is making me a bit crazed. Plus, it seems like I'm rescuing cut fabric from E's drool-drenched hands every time I hop off my treadmill desk!
To solve the fabric-clutter issue, I'm thinking about making one of our Saturday Sampler 2014 quilts. Since I only receive the fabric for one block every month, small, colorful piles of neatly folded fabric (read: baby magnet) will be kept to a minimum or at least have a spot somewhere out of reach. Now I just have to decide which one to make! Which one is your favorite?
If you haven't participated before, here's how it works: our Saturday Sampler (SS) is a unique twist on a Block of the Month program. First, you choose one of four quilts (each in a different colorway or theme), purchase the pattern, and pay $5 for your first block. If you bring both your SS punch card and the previous month's finished block to us on one of three designated days (the second Saturday of the month and the following Monday and Tuesday), you get your next block for FREE. On the occasion that life gets in the way and your block isn't finished in time or you can't drop in on one of the SS days, that month's block is $5. More often than not, QPers make an entire quilt for just $5 or $10 plus the optional finishing kits!
Only one block per quilter can be free each month, so those who choose to do two, three, or all four quilts pay $5 per month for those quilts' blocks (regardless if their sewn or not). It's an extremely economical way to make a quilt and it's tough to resist the four very different colorways and patterns Kathy and
Mary handpicked. Learn more about each design in the
Facebook album I'll be adding each month's blocks to all year or scroll down for a preview.
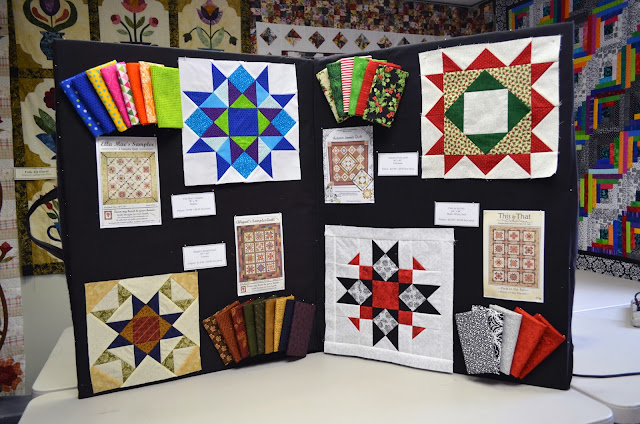
Ella Mae's Sampler (78''-x-78'')
Style: Brights | First Block: $5 | Pattern: $7.99
Abigail's Sampler (50''-x-60'')
Style: Country | First Block: $5 | Pattern: $11.99
Autumn Jewels (84''-x-84'')
Style: Christmas | First Block: $5 | Pattern: $19.99
Paris in the Fall (66''-x-86'')
Style: Black, White & Red | First Block: $5 | Pattern: $22.99
Sign up starts today, Wednesday, November 20th, but not all of the patterns will be in-stock until tomorrow, Thursday, November 21st. Call the shop at (517) 423-0053 or drop in to sign up.


.gif)


